

Welcome back everyone! Did you pick up the new release from Neat & Tangled yet? You totally should! It’s amazing! You can pick up the entire release in one discounted bundle too! (click HERE to pick up your release goodies)
GIVEAWAY
Each day we are having a giveaway so be sure to leave a comment on the Neat & Tangled blog to be entered. Today’s prize is going to be the Starry Sky Background which I’m featuring today. Also, leave a comment on the Designer’s blogs and a winner will be chosen from throughout the week for a $25 gift certificate to the store. Winners will be announced Friday, September 27 at 7:30 am EST.
CARD DETAILS
My card today is featuring the Starry Sky background. This creates such a magical edge to you card fronts. It is a red rubber stamp that measures 4 1/4″ x 5 1/2″ and fits an A2 size card perfectly.
I started my background by first ink blending the edges of a piece of Lapis card stock. I used Cornflower and Navy ink from Hero Arts and applied the ink with my Life Changing Blender Brushes from Picket Fence Studios. I’m working on a Waffle Flower Media Mat which is Silicone and helps hold my card stock in place while I ink blend.

Once my background is dry, I can stamp my background.
If you are using a stamping tool, like the Misti which is what I did, you need to remove the foam insert piece from the Misti. I stamped my background onto my ink blended panel using Embossing Ink. Then heat embossed Gold Embossing Powder. Dreamy right?

I trimmed a smidge off the edges and attached to a card front made from Fog card stock.
For my Lunar Moth from the Moon Magic stamp set, I stamp the image onto Pearlescent Vellum from Lawn Fawn with Embossing Ink. Then applied Silver Embossing Powder and heat set. I used the coordinating die to cut out my image and also cut out 2 more from the Pearlescent Vellum. Vellum can be tricky to attach without showing the adhesive which is why I cut out 2 more. I was able to layer these together by completely covering them with tape runner adhesive making sure my embossed image was on top. Sneaky right?
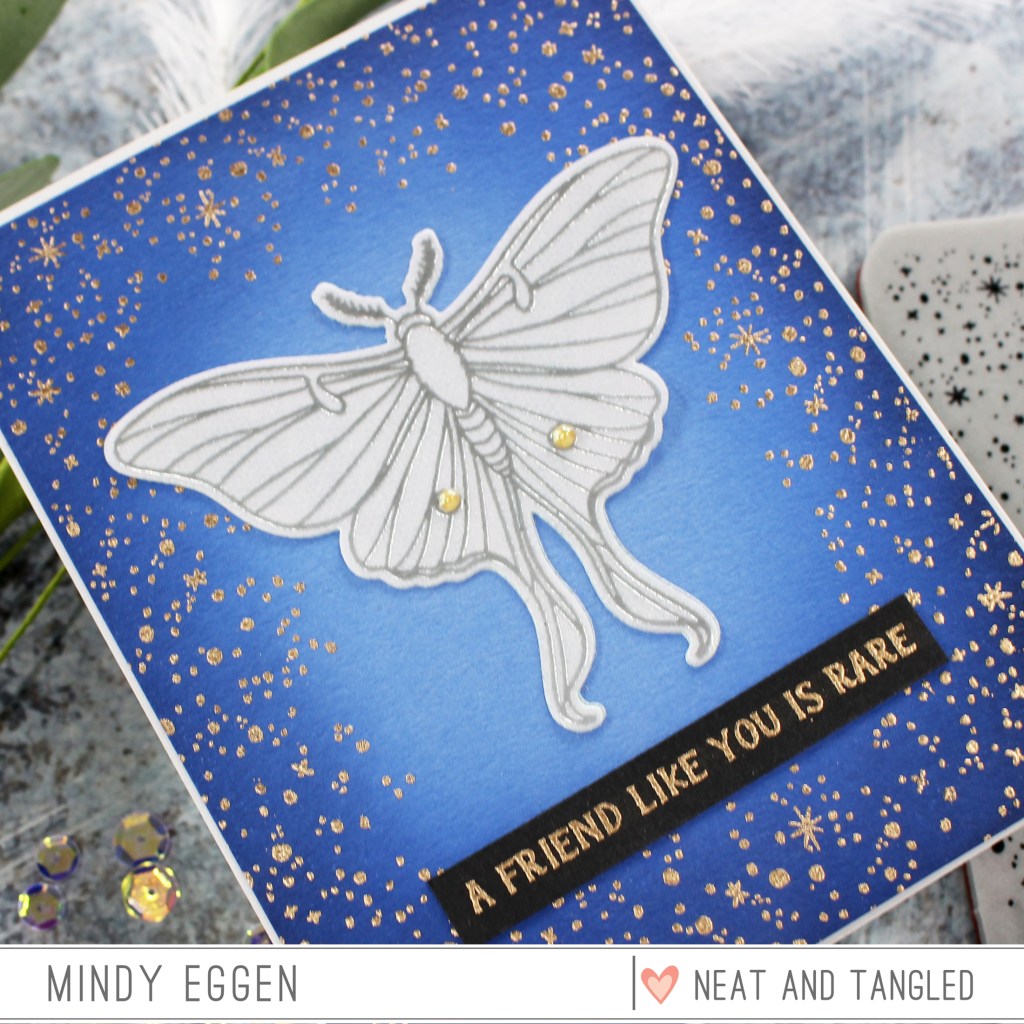
I finished off the card by adhering a sentiment from the Moon Magic stamp set. I had heat embossed the sentiment in Gold onto Pitch Black cards stock. I also added a couple drop of Nuvo Gold Luxe Dream Drops to the small dots on the wings of the Moth.
I hope you enjoyed today’s inspiration! Be sure to stop back tomorrow as I will have more to share!
SUPPLIES
Below you will find links to some of the supplies I used to create my project. Click the icon to start shopping. Compensated Affiliate links are used at no additional cost to you. Your support helps me to keep bringing you new projects and videos. Thank you!


Fantastic background! And I love the silver embossing! 🙂
Lovely card! I love the gorgeous background you created for the Luna moth!
Love the beautiful moth image. Your card is so lovely.
I love the gorgeous background and embossing!!!!!!!!!!!!!!!
This is gorgeous!
So beautiful. Love the gold embossing.
Beautiful card!
Love the framing. Leaving the moth
uncolored was a great idea. he really
pops. thanks for sharing
txmlhl(at)yahoo(dot)com
Beautiful card! I love the gold with the starry sky stamp!
Gorgeous!! I just LOVE this gorgeous starry sky background! And the moth looks amazing embossed in silver!
[…] the glorious Moon Magic stamp set paired with the Starry Background. You can read about this card (HERE) on my earlier […]